Adding scleral profilometry to our practice was a game changer for creating more complexly customized scleral lenses, based on individualized image-driven guidance. The initial fitting challenges were now much easier to overcome, particularly for those new to providing these lenses. Even for experienced fitters, this system can be beneficial.
Scleral topography and profilometry can supplement the traditional process of scleral lens fitting—empirically providing a best-fit lens that matches the ocular surface on a micron scale. This can help save time and cost while providing optimum comfort and vision for your patients. Without profilometry, we do not have the big picture of the scleral shape.
This article will review the fitting process as done in our office and encompass initial conversations to initial follow-up. In my office, we use an Eaglet Eye Surface (ESP) Profiler in particular.
Scleral shapes are highly variable, and only about 5% to 6% are simple spheres, based on data found in the Scleral Shape Study.1 In fact, the Scleral Shape Study Group reported that a relatively small percentage of eyes are described as regularly toric (28.6%), with the remaining 40.7% classified as asymmetrical toric and 26% as irregular toric. The Scleral Shape Study Group looked at the pattern of scleral shapes and found that a minority of patients (roughly one-third) had rotationally symmetric scleral shape patterns and the majority of patients (roughly two-thirds) had irregular patterns with either asymmetric depressions or elevations.
We generally follow a decision tree for each patient based on key findings, including how much toricity they have at about the 12.0mm to 13.0mm corneal scleral junction and the magnitude of the delta at about 15.0mm, generally in agreement with the Scleral Shape Study.
 |
|
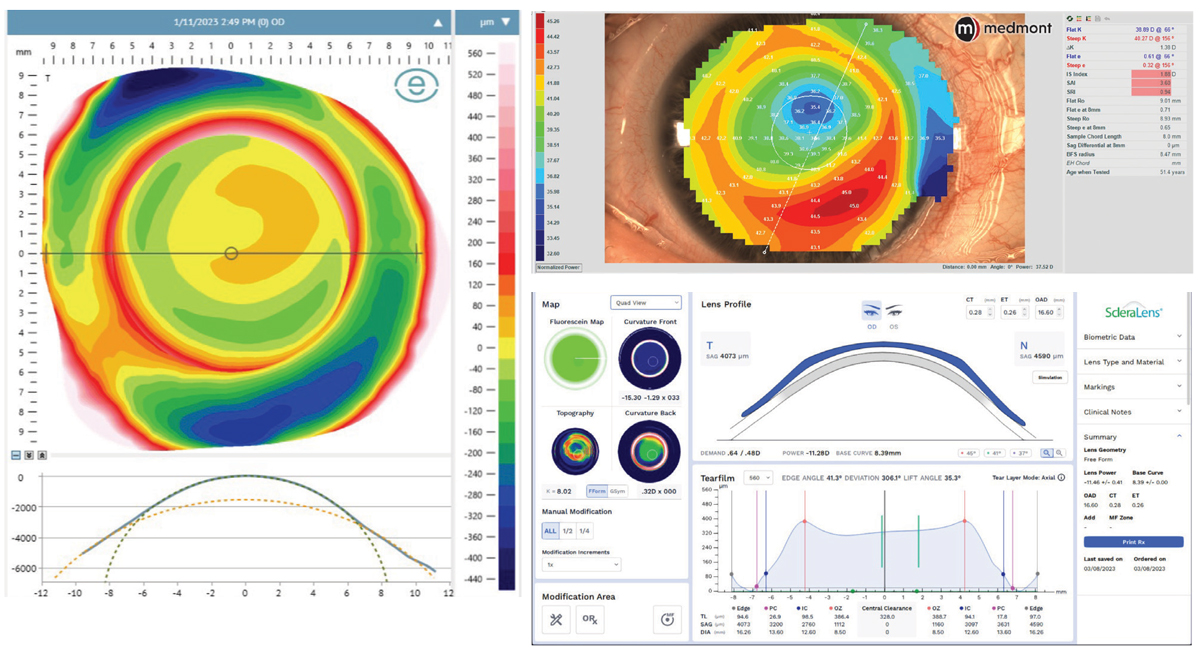
Case 1. Medmont topography and Eaglet ESP profilometry of a post-LASIK patient with irregularity and significant glare. A Wave freeform scleral lens was designed. Click image to enlarge. |
Typical Workup Flow
In my practice, we have traditional topography as well as Eaglet ESP profilometry and AS-OCT imaging easily accessible.
On the initial visit, my team performs a comprehensive eye exam, corneal topography and refraction. We also do an OCT-based corneal pachymetry map on initial visit to gain more information about the corneal status. After this discussion and when we mutually decide to proceed with a scleral lens solution, we schedule the patient for a second visit and ask that they stay out of currently worn hybrid or scleral lenses from Friday evening until we see them next Monday morning to minimize any impression effects their current lenses may have on their sclera that may adversely affect our evaluation and future design.
The first step at this visit in our office has now become scleral profilometry, otherwise we have no idea what scleral shape or irregularities we will have to manage. Before we begin imaging, we have each patient wash their eyelids with ocular foam cleanser to reduce slipperiness when we hold their lids. The ESP uses NaFl for image acquisition. It is usually applied to the superior, nasal, temporal and inferior scleral surfaces. We instill a hyaluronic acid-based tear drop. We add a drop of proparacaine to gently anesthetize the eye. We then wet fluorescein strips with preservative-free saline and gently apply them to the scleral surface. We use a UV penlight to inspect to make sure we have carefully painted the scleral surfaces. From there, the eyelids are opened and a single image is acquired while the patient is in primary gaze.
We typically have the doctor shoot the images and direct the process while a staff member helps retract the eyelids. Position the patient into the instrument. I have a staff member assist with holding the upper lid while wearing purple nitrile gloves. For some patients, we use an Oculus Lid Stick, which has a specially-shaped silicone tip shaped to conform to the external lid and is helpful for retracting the upper lid. We usually have the patient retract their lower lid, as we observe the result on the video monitor of the Eaglet ESP. We use a joystick to carefully align and bring the image into focus. Eaglet has recently added quality indicators for image centration, eye surface coverage and focus. They display red, yellow or green for a quick assessment of image quality. We want a nice full image to capture as much of the sclera as possible.
In my practice, we acquire several images with the goal of having three very high-quality images based on image centration, coverage and focus. We flag the best images, then mark one of them as our baseline image that will be used for our scleral lens design.
Review the profilometry results with each patient, looking at the elevation difference at or about a chord equal to the patient’s horizontal visible iris diameter (HVID). We also look out at the 15mm and about 16.5mm chords, to see how much irregularity and elevation difference is present on a micron scale. I like to do this for my three favorite images for each eye to make sure the data is repeatable.
I explain the color elevation map to the patient and tell them the blue areas are like the Atlantic and Pacific oceans, way down at sea level. The green and yellow areas are moderately elevated, for example, like the states Illinois or Iowa. The red areas are most elevated, for example, like Colorado. We let them know that our goal is to sculpt their lenses to fit these areas of their eyes like a tailor-made suit. A simple spherical haptic, a symmetric toric haptic, a highly customized digital haptic, or in some cases, a bi-elevation or dual-sagittal haptic can be the solution to their problems. The goal is to understand for each patient what type of corneal and scleral shape they happen to have so that we can match the ideal lens design to their eye.
We generally apply only a single diagnostic scleral lens of known base curve and power, then perform a spherical overrefraction (OR) and sphero-cylindrical over refraction (SCOR) to assess for best visual acuity and lens power calculations needed to design our new custom scleral lens. Then, a quick compilation of the key findings is done on a worksheet that I created for in-office use that is used for lens type selection and for designing the desired lens.
 |
|
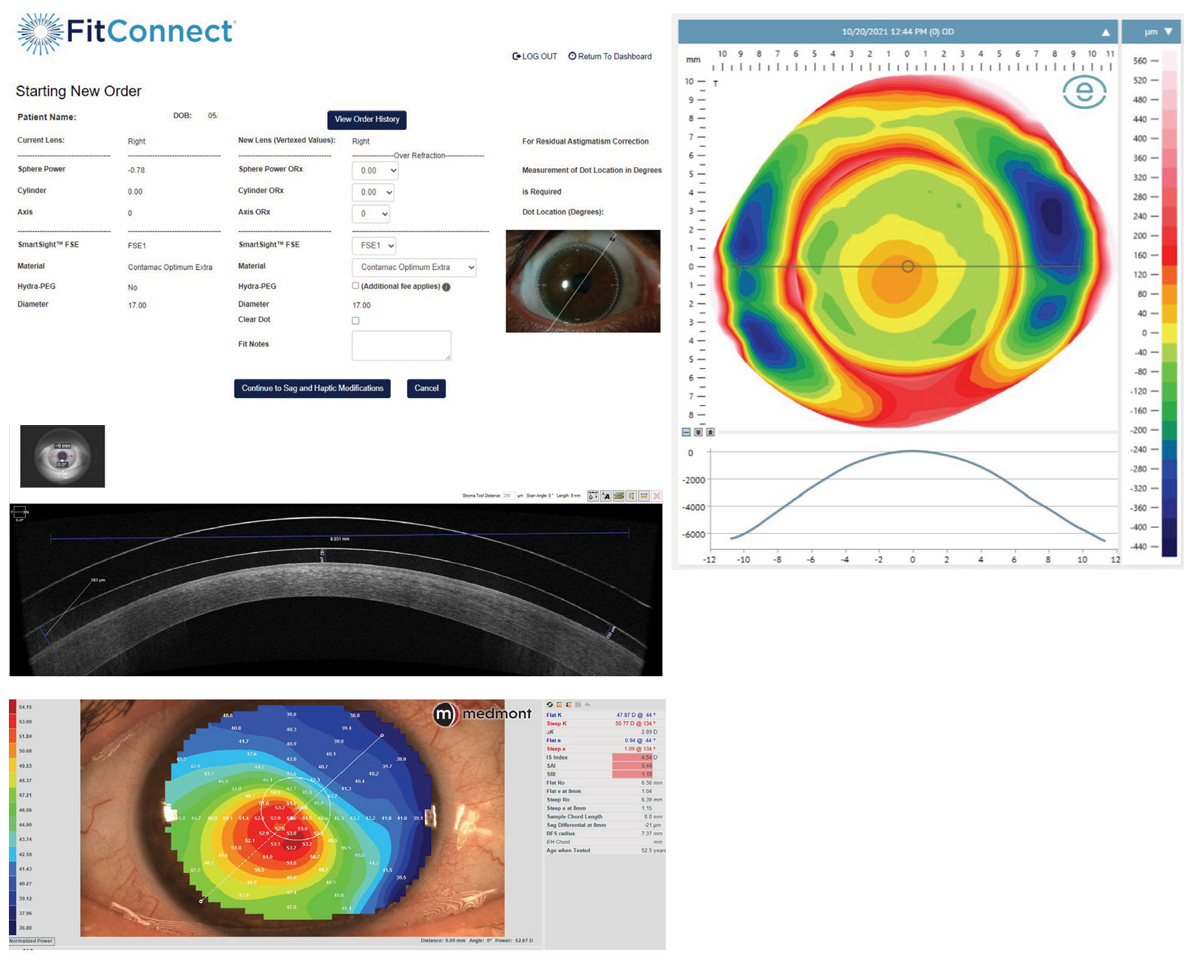
Case 2. Medmont topography and ESP prolifometry of a keratoconus patient with an unstable cornea. A BostonSight Smart 360 digital lens was designed. AS-OCT raster scan of cornea and BostonSight scleral lens were taken 10 to 14 days later. Click image to enlarge. |
Time to Design
After the patient leaves, begin work on the custom scleral design. We use the HVID/ vertical VID measurements, profilometry results and refractive data to design a custom scleral lens made based on these findings. We consider several design options, including a simple toric haptic, a lens with a dual sag at the corneal-scleral junction or a full 360º digital haptic in some cases.
One of the things I enjoy with our scleral profilometry system is the ability to select and design scleral lenses from several different vendors based on my particular patient’s eye shape characteristics. Eaglet Eye does not manufacture scleral lenses in-house but instead has partnered with more than 20 scleral lens labs worldwide. Some in particular include ZenLens (all sclerals), BostonSight (BostonSight Scleral), Blanchard (all Onefit designs), EyePrint Prosthetics (ScanFit Pro), Acculens (Maxim), X-Cel (Atlantis), Advanced Vision Technologies (Naturalens Scleral), ValleyContax (Custom Stable and Gaudi) and SynergEyes (VS Scleral and Ultrahealth Hybrids). A complete list is available on the company’s website.
Prior to using profilometry, we used to apply several scleral diagnostic lenses to try to judge how much sagittal depth was needed, how much, if any, toricity was needed and if we needed to make the haptic steep or flat to align the patient’s scleral shape and prevent unwanted edge standoff or excessive tightness that would lead to blanching and vessel compression. During our new fit process, we prefer to design the “best fit sphere” instead of an “off the rack” design, which may have too little or excessive mid peripheral clearance that would provide a suboptimal result and possibly lead to conjunctival prolapse. The best fit sphere data helps us design a lens that has an optimized curve that better aligns to each patient’s unique corneal curvature, whether average, steep (prolate) or flat (oblate).
 |
|
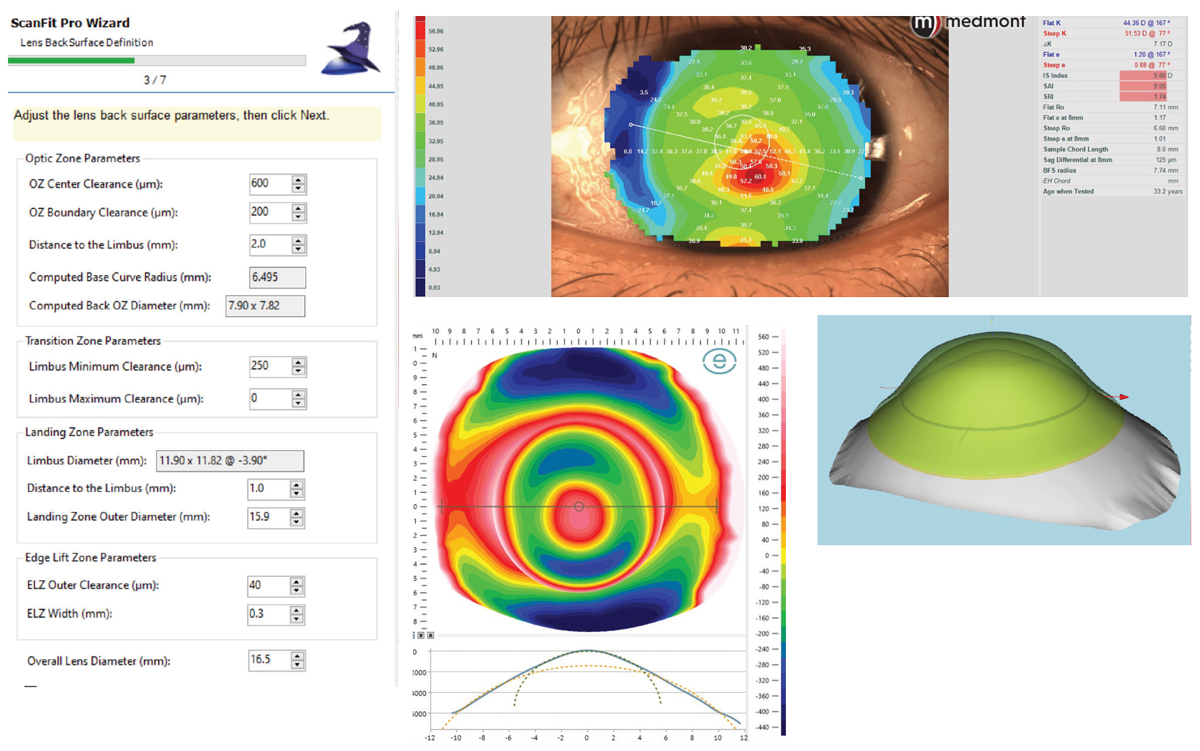
Case 3. Medmont topography and ESP profilometry of a patient with a highly toric cornea and sclera, as well as a steep cone. A ScanFit Pro digital lens was designed. The ScanFit Pro screen for back surface parameters is shown, as well as the final result. Click image to enlarge. |
Troubleshooting and Follow-up Scheduling
Once the patient’s lenses are received from the selected lab, we schedule the patient to come in and apply their new lenses with NaFl in the bowl. Our staff uses a blue UV penlight to assess the lens to make sure there is no air bubble and to assure that there is no inadvertent corneal touch. The patient is then escorted to an exam room, where we assess with the slit lamp, check initial visual acuities and do a spherical and sphero-cylindrical over-refraction. In most cases, the VA is quite acceptable, and we design the initial central clearance to be a bit generous, anticipating the lens will settle.
Discuss with the patient that the sclera is spongy, like a memory foam mattress, and that the lens will settle over several days of wear. The trouble is that you will not know how much their lens may settle until you see them back.
It’s important to have your staff give the patient detailed personal and written instructions regarding scleral lens care and handling, and be sure to schedule the patient back in about 10 to 14 days, at which time the staff will continue to do AS-OCT imaging of the lens at several key points, including central clearance, mid peripheral clearance, limbal clearance and haptic alignment, as well as viewing with our slit lamp biomicroscope. After AS-OCT imaging the patient is brought into an exam room, VA is checked again and we perform a careful spherical OR and SCOR. If necessary, we make any fine tuning adjustments to optimize the physical fit and the lens power.
After the lens has gone through a settling period, we determine at this point if there is any need to adjust and optimize lens power. If there is significant residual cylinder after ruling out lens flexure, we may add a front surface toric and carefully note the position of lens orientation marks for cylinder axis calculation. If needed, we also adjust the lens central clearance, mid peripheral clearance (via a base curve change), limbal clearance and alignment of the haptic, based on AS-OCT imaging and slit lamp findings. The first lens is generally remarkably close and typically only needs mild refinements to optimize and enhance the physical fit and lens powers.
“I never fit the same lens twice. By the time a patient returns for a new lens, either I have learned something new, enhanced my skills or new technology is available to improve on the previous lens design,” says Dr. Pal.
Scleral profilometry has helped us elevate our scleral lens design to a higher level, streamline our process and has reduced the number of revisions needed to achieve a beautiful fit. With the right technology, practitioners can provide their patients faster fits, less chair time and better visual outcomes.
Dr. DiGiorgio practices at Vision Source-Orland Park in Orland Park, IL. He has served as president of the Chicago South Suburban Optometry Society and as a director for the Executive Council of the Illinois Optometric Association in Springfield. He is a charter member of the Contact Lens section of the American Optometric Association. He has no financial disclosures.
1. DeNaeyer G, Sanders D, van der Worp E, et al. Qualitative assessment of scleral shape patterns using a new wide field ocular surface elevation topographer: The SSSG Study. JCLRS. 2017;1(1):12-22. |