The level of scleral lens interest we’re experiencing today hasn’t been seen in nearly a century. Contact lens specialists of the early 1900s conceptualized new designs, developed better materials and perfected the fitting of these large-diameter, cornea-vaulting lenses. We—their 21st century successors—have taken up the mantle and continue to refine the designs, expand the candidate pool and improve the wearing experience to the point that sclerals can often stand shoulder-to-shoulder against corneal lenses as a viable alternative.
If you’re new to sclerals, don’t worry. The lenses are easier to fit than you may think. This start-up guide can help you learn how best to approach a scleral lens fitting.
Meet the Candidates
To identify ideal candidates for scleral lenses, you must first understand the benefits large-diameter gas permeable (GP) lenses can provide. At the top of the list is the fluid layer created between the cornea and back surface of the lens. This fills in the hills and valleys of an irregular corneal surface to negate irregular astigmatism, just like corneal GP lenses. The fluid layer also bathes the entire cornea during lens wear, while the large lens size protects the ocular surface from environmental agents, eyelid friction and air exposure. The lens sits behind both eyelids, and the large diameter limits interaction with the lens edge, significantly improving comfort for patients that have had trouble tolerating corneal lenses in the past. Also, a properly fit scleral lens does not move much, if at all, further improving comfort.
Based on these benefits, patients with irregular corneas make excellent candidates for scleral lenses. According to the SCOPE study, 74% of scleral contact lenses are prescribed for patients with irregular corneas. Conditions such as keratoconus, corneal transplants, Salzmann’s nodular degeneration and post-surgical conditions have all responded positively to the vision correction scleral lenses provide.1
Those with ocular surface diseases significant enough to cause burning, pain and light sensitivity generally have the best response to scleral lens wear in terms of ocular surface protection. Sjögren’s syndrome, basement membrane dystrophies and exposure keratitis are in this category and make good scleral lens candidates. These patients account for about 16% of all scleral lens evaluations.1
The other 10% of scleral lenses are prescribed for patients with normal corneas and healthy ocular surfaces looking for improved contact lens performance.1 This category includes patients with active lifestyles, high refractive error and high astigmatism.
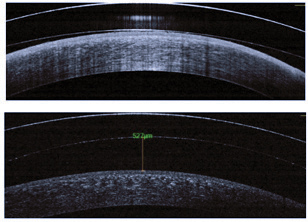 |
| Fig. 1. Anterior segment OCT images of a scleral lens with excessive and insufficient corneal clearance. |
First Things First
A successful scleral lens fitting begins with an understanding of how these lenses differ from corneal GP lenses. For one thing, the techniques used to measure the cornea and select a lens from the fitting set are different. Corneal GP lenses are designed based on topography and keratometry measurements, and you must select a lens base curve to align with the corneal surface. The goal of the fit in these cases is to facilitate movement and tear exchange with blinking.
During scleral lens fittings, however, you must select lenses from fitting sets based on the sagittal depth of the cornea. Here, the lens should vault the ocular surface. While you can use topography for complete medical management and understanding of the corneal condition at hand, only a small amount of topographical information is used in selecting the trial lens from a fitting set. The important information includes corneal diameter and overall corneal shape (i.e., prolate or oblate). Anterior segment optical coherence tomography (OCT) can also be helpful when selecting trial lenses, but only if the system can measure a large area of the ocular surface. This allows you to determine sagittal depth at a certain chord diameter.
Additionally, because keratometry readings do not correlate with sagittal depth of the anterior chamber, the base curve of a scleral lens does not need to correlate with corneal measurements.2 For example, a patient with keratoconus may have a small nipple cone with steep keratometry readings and a shallow anterior chamber, or a corneal transplant patient can have a deep anterior chamber with flat keratometry readings.
Select a Fitting Set
Those interested in scleral lens fitting often wonder which fitting set is the best choice. Sclerals come in a wide variety of shapes, so there is no definitive, one-size-fits-all design. While there is no wrong answer when selecting your first fitting set, following certain guidelines can help you pick the set most applicable to your patient base.
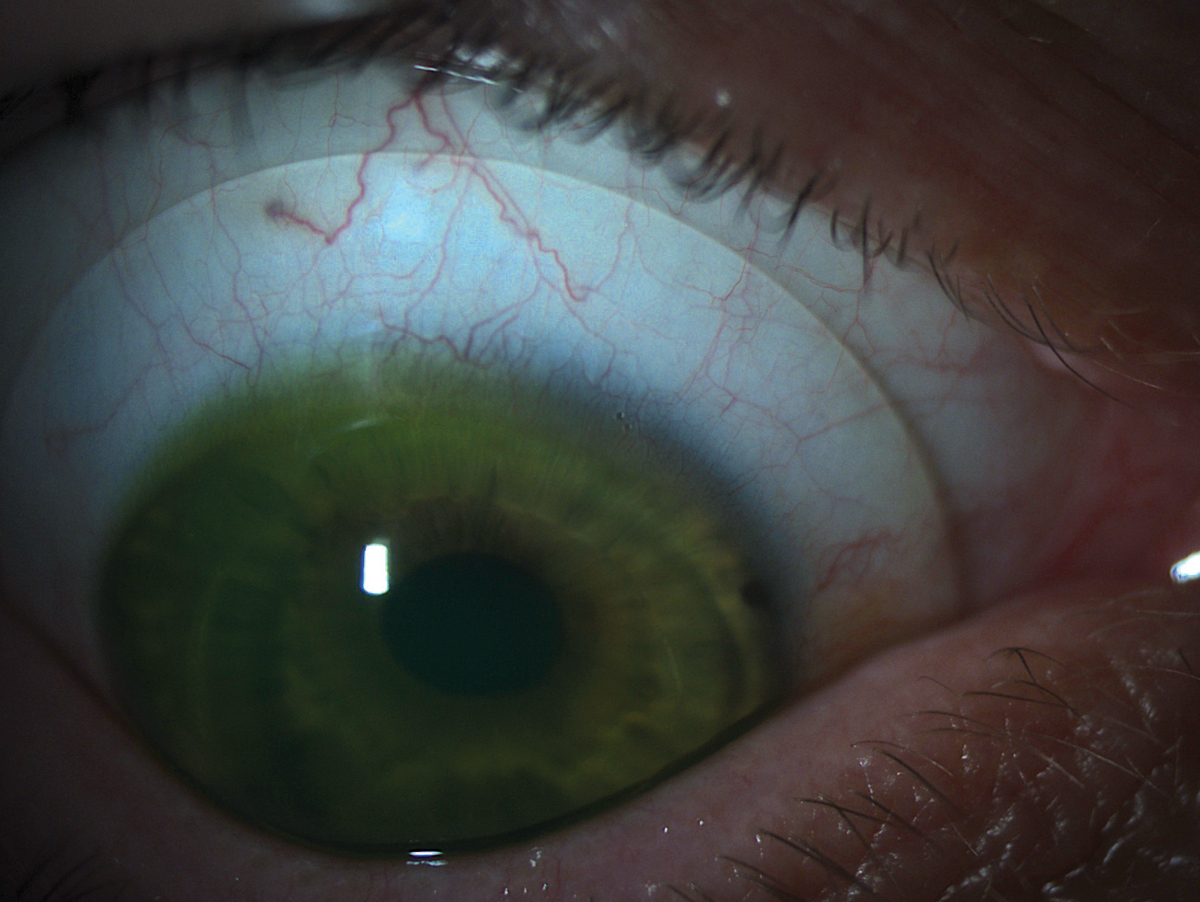 |
| Fig. 2. A scleral lens with appropriate alignment to the scleral shape. |
Many fitting sets offer multiple diameters, allowing you to fit both large and small corneas. This immediately opens up your options.
Having a range of lens shapes on hand can also make your life easier. It would also be prudent to look for a set with designs to fit both oblate and prolate corneas. Beyond that, consider the extras you’ll need to perfect the lens fitting. These can include front-surface toric correction, toric peripheral curves and multifocal optics. The larger your applicable population, the more likely you are to use all of these tools, and you’ll want to make sure the lab you choose has the ability to provide them. Following these guidelines should get you off to a good start, and you can always fill in gaps with additional sets as you gain experience.
Start the Trial
After you’ve selected your fitting set, your attention should turn to the lens trial. Here, the ability to swiftly make lens selections and adjustments is essential. Your fitting set may group the lenses by diameter, lens shape or edge lift. Within those groups, the lenses are often further sorted by sagittal depth. Some lens sets have a 100μm difference in sagittal depth between each lens, others more than 300μm; familiarizing yourself with the difference will make lens fittings and selections much more efficient.
For example, imagine your initial lens has far too much apical clearance and you need to decrease it by around 300μm. If the set has a 100μm difference between lenses, you need to jump down three lens steps to reach ideal corneal vault. For a set with a 300μm difference, meanwhile, you only need to jump one lens step to achieve the required vault. Getting a feel for this can take some practice. In cases where I can visualize a patient’s corneal ectasia by looking at their corneal profile from outside the slit lamp, I select a lens from the deeper end of the fitting set. If the corneal shape looks normal to the naked eye, I start with a lens from the shallower end of the set instead.
Once you’ve made an appropriate selection, it’s time to prep the lens for application. Start by placing a clean lens on a large DMV lens plunger (DMV Corp.) and filling it with preservative-free saline. Next, dab a sodium fluorescein strip in the saline to lightly dye the liquid. Now you can apply the lens evenly to the ocular surface, making sure to avoid forming bubbles in the lens chamber. With scleral lenses, a bubble under the lens will not work itself out as it would with some corneal GP lenses, so the lens must be removed and reapplied when a bubble forms. The Scleral Lens Education Society website (www.sclerallens.org) provides an in-depth list of application and removal techniques you might find helpful.
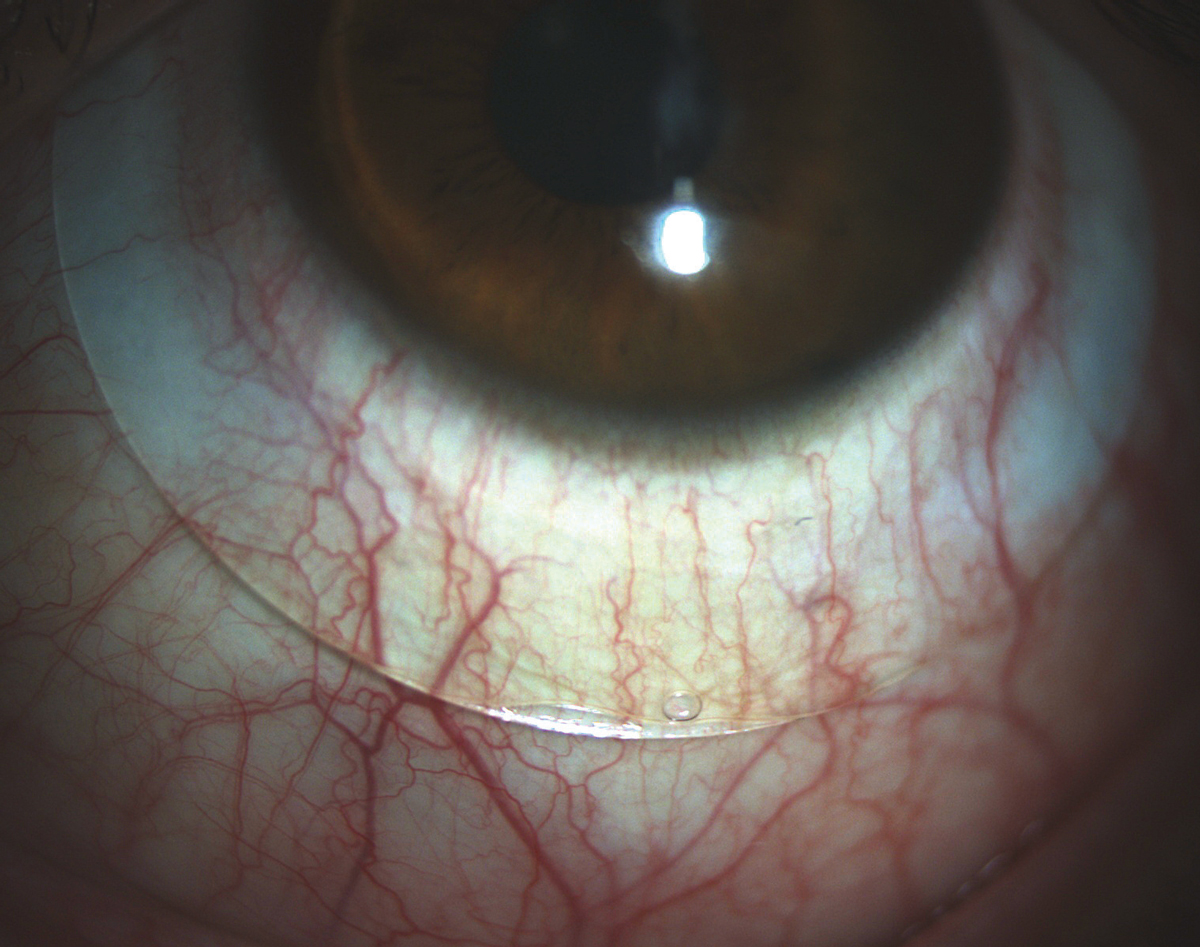 |
| Fig. 3. A scleral lens showing both compression and edge lift in the landing zone. A toric peripheral curve system would improve the alignment of this lens. |
Evaluate the Fit
With the lens on eye, the fit evaluation can begin. Evaluating a scleral lens used to have an artsy/instinctive feel, and while there still is an art to lens modifications, instruments such as anterior segment OCT and scleral topographers have dramatically improved our ability to analyze how a lens behaves on an eye. With technologyies like these, clinicians can determine the clearance between the lens and corneal apex as well as the amount of scleral toricity. These advances are getting us closer and closer to empirically designed scleral lenses, but for now an in-office fitting from a trial set is still the first step.
Start by evaluating the central vault at the slit lamp and compare the clearance of the lens over the cornea with the lens thickness at the anterior-most point of the cornea. If the vault is significantly thicker, the lens is too deep and you’ll need to switch it out for another one. The lens should also be replaced if it shows cornea touch or minimal central clearance.
Next, move the slit beam from the central cornea through the mid-peripheral cornea and to the limbus to evaluate the amount of clearance over the limbus. Keep in mind that while there may be clearance over the limbus, fluorescein is not always visible in small spaces. In these cases, OCT measurements are needed to confirm clearance. Ideal measurements have changed over the years, but today acceptable amounts range from about 250μm to 100μm of central clearance and about 20μm to 40μm over the limbal area after lens settling.3 Scleral lenses settle into the conjunctival tissue between 76μm and 146μm on average; thus, at the initial scleral lens evaluation, your goal corneal vault should be about 150μm greater than the desired endpoint (Figure 1).4,5
Last but not least, evaluate the relationship between the lens and the scleral surface. The vasculature under the lens landing curves should appear normal and without compression or impingement (Figure 2). If the edge of the lens is digging into the conjunctival tissue, causing a visible gutter or compression ring after the lens is removed, you’ll need to flatten the peripheral curves. Steeper peripheral curve systems are also necessary if the patient comments on lens awareness or if debris seeps into the fluid chamber and cloud the patient’s vision.
If a scleral lens patient requires both steeper and flatter curves, you’ll need to turn to a toric peripheral curves system. In these cases, there may be obvious compression in the nasal-temporal meridian and edge lift superior-inferior, or just asymmetry in the appearance of the vasculature under the lens landing curves (Figure 3).
The process of determining power with a scleral lens fit is similar to any other contact lens design. Since over-refractions do not change significantly as the lens settles, you can perform them soon after the lens is placed on the eye.6 Retinoscopy is a great starting point because it gives you an idea of the improvement in the corneal reflex through the lens material. Try a spherical over-refraction and assess visual acuity and vision quality. If the visual acuity is unacceptable, repeat the over-refraction with a sphero-cylindrical assessment. If this improves the patient’s visual acuity, a consultant from your laboratory can help you decide if a front-toric scleral lens design is the best route or if a design change may negate some of the astigmatism in the over-refraction.
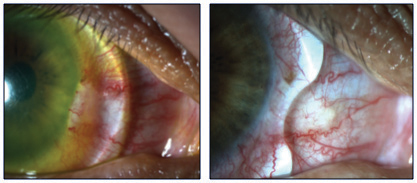 |
| Fig. 4. A notched scleral lens will decrease irritation of a pinguecula. |
Make Adjustments
More often than not, lens shape adjustments are needed to achieve an optimal fit. Some basic tweaks include vault and peripheral curve changes, while more advanced techniques include working around pingueculae and other bumps in the conjunctiva (Figure 4). When changing the central vault of the lens, be sure to evaluate the highest point of the cornea, which is not always at the center of the lens. For example, in most keratoconus patients, the apex may be below the line of sight, and in post-keratoplasty patients it may be in the superior cornea. Also, be sure to specify whether you need to increase clearance throughout the entire lens chamber or just at the central area.
Limbal curve adjustments can be made in two ways. The first option is to adjust where the curves land on the sclera. If insufficient limbal clearance is present, you can make the corneal chamber larger so the lens lands posterior to the limbus rather than on top of it. This tends to be the case for patients with large corneal diameters. The second option is to adjust the angle at which the curve contacts the scleral surface. If the angle is too wide and excessive limbal clearance exists, the patient may say the lens feels tight after a few hours of wear. If the angle is too shallow and it causes the lens to land on the limbus or peripheral cornea, the patient may complain of pain and the lens will move with the blink.
The peripheral curve system is designed to fit the contour of the sclera, which can vary greatly in shape from patient to patient. One indication for adding a toric peripheral curve system to a scleral lens is significant lens movement on blink. This indicates a loose superior-inferior meridian, allowing the lens to rock back and forth on the steeper scleral curves. Another indication is the patient commenting on progressive clouding of the fluid chamber, which could also indicate a loose edge. Lastly, toric peripheral curve systems can improve scleral lens centering and, as a result, overall performance of the lens optics, especially in cases of front-toric or multifocal prescriptions.
The basic fitting techniques described here are enough to get you started with scleral lens prescriptions in your practice. While the initial learning curve may seem steep, scleral lenses can provide you and your patients with rewards that far outweigh the required effort.
Dr. Messer received her doctor of optometry degree and completed a cornea and contact lens residency at Southern California College of Optometry. She now practices in Edina, MN, with special interests in scleral, multifocal and orthokeratology contact lenses.
1. Nau CB, Harthan J, Shorter E, et al. Demographic characteristics and prescribing patterns of scleral lens fitters: The SCOPE Study. Eye Contact Lens. June 14, 2017. [Epub ahead of print]. |